How to Style Curly Hair: A Complete Guide for Healthy, Defined Curls
If you’ve ever spent 30 minutes styling your curls only to watch them become frizzy, flat, or lose their shape a few hours later, you’re not alone. Many people with curly hair follow advice they find online, buy popular products, and copy someone else’s routine, only to end up wondering why their results look completely different.
One of the biggest lessons I’ve seen while researching curly hair care is that there is no universal styling routine. Two people can have similar curl patterns but completely different porosity, density, or strand thickness. That’s why a technique that creates perfect curls for one person may leave another with flat, stringy, or dry hair.
The good news is that styling curly hair becomes much easier once you understand how your own hair responds to moisture, products, and styling techniques. You don’t need dozens of products or a complicated routine. In most cases, a few small adjustments—such as applying products in the right order, choosing a technique that matches your hair type, or changing how you dry your curls—can make a noticeable difference.
In this guide, you’ll learn how to style curly hair step by step, understand why different techniques work, avoid common styling mistakes, and build a routine that fits your curls instead of copying someone else’s.
What You’ll Learn
By the end of this guide, you’ll learn:
- How to choose the right styling technique.
- Which products to use.
- How to reduce frizz.
- How to make curls last longer.
- Common styling mistakes to avoid.
Quick Answer
The best way to style curly hair is to apply products to soaking wet hair, distribute them evenly, encourage natural curl clumps, and let the curls dry with as little disturbance as possible. That said, the exact technique that works best for you will depend on your curl type, hair porosity, density, and overall styling goals.
New to styling curly hair? Don’t worry if you don’t get perfect curls on your first wash day. Most people try several techniques before finding the routine that works best for their hair, so start with one styling method, practice it a few times, and make small changes as you learn what your curls actually like.
Why Curly Hair Needs a Different Styling Routine
Curly hair has bends and twists along every strand. This unique shape also affects how the hair cuticle holds moisture and styling products, making curly hair more likely to become dry or frizzy than straight hair.
A good styling routine helps you:
- Improve curl definition
- Reduce frizz
- Lock in moisture
- Prevent breakage
- Make curls last longer
- Keep your natural curl pattern healthy
Styling isn’t about forcing curls into shape — it’s about giving them the support they need while they dry.
Curly hair tends to become drier than straight hair because its spiral shape makes it harder for natural oils from the scalp to travel down the hair shaft. Keeping curls moisturized through gentle cleansing and regular conditioning is widely recommended by dermatologists. Source: American Academy of Dermatology Association (AAD); Cleveland Clinic.
Curly hair also changes shape as it dries. When your hair is wet, temporary hydrogen bonds inside the hair shaft loosen. As your hair dries, these bonds reform and help set your curl pattern. This is why styling techniques such as scrunching, finger coiling, and brush styling work best while your hair is still wet.
Understand Your Hair Before You Style It
No two heads of curly hair are exactly the same, so before choosing styling products or techniques, it helps to understand these four key factors.
Curl Pattern
Your curl pattern plays a big role in how much moisture and hold your hair actually needs.
| Curl Type | Description | Main Styling Goal |
| Type 2 (Wavy) | Loose S-shaped waves | More definition without losing volume |
| Type 3 (Curly) | Spiral curls and ringlets | Moisture with long-lasting definition |
| Type 4 (Coily) | Tight coils or zig-zag curls | Moisture, stretch, and shrinkage control |
Your curl type is a helpful starting point, but it’s only one part of the bigger picture when it comes to building a routine.
Hair Porosity
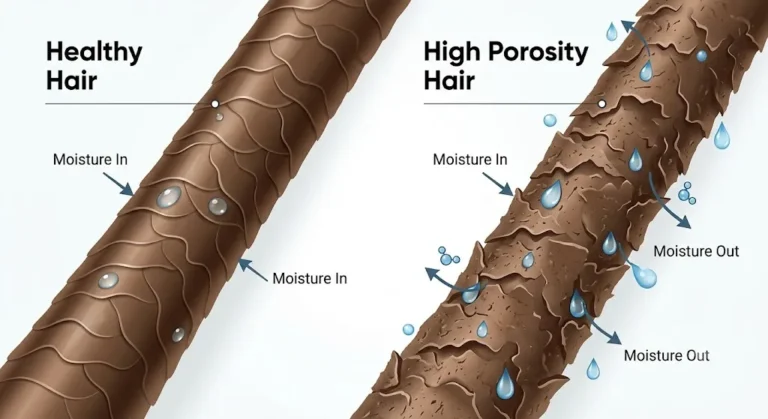
Hair porosity affects how easily water and styling products move into and out of the hair shaft. While porosity isn’t something you can judge just by looking at your hair, understanding it can help you choose products that actually match your hair’s moisture needs. High Porosity Hair absorbs water quickly. Moisture escapes just as quickly. Rich creams, leave-in conditioners, and stronger hold gels usually perform better
Low Porosity Hair
- Water stays on the surface.
- Products absorb slowly.
- Lightweight creams and gels usually work best.
Medium Porosity Hair
- Moisture stays balanced.
- Most styling products work well.
High Porosity Hair
- Hair absorbs water quickly.
- Moisture escapes just as quickly.
- Rich creams, leave-in conditioners, and stronger hold gels usually perform better.
Knowing your porosity often makes a bigger difference to your results than knowing your curl type alone.
Hair Density
Hair density describes how much hair grows on your scalp, and it changes how products should be applied.
- Low Density: Choose lightweight styling products that won’t flatten your curls.
- Medium Density: Most styling techniques work well with this hair type.
- High Density: Apply products in small sections to make sure every strand is covered evenly.
Hair Strand Thickness
Hair strands can be fine, medium, or coarse, and this affects how a product performs once it’s applied. Fine hair becomes weighed down easily, while coarse hair usually needs richer moisturizing products and a stronger hold to keep curls defined throughout the day.
Understanding these characteristics helps you build a styling routine that suits your own hair, rather than one that simply copies someone else’s results.
Before You Copy Someone Else’s Curl Routine
One of the biggest mistakes curly-haired people make is copying someone else’s routine exactly, without accounting for how different their hair might actually be. Two people can share the same curl pattern but have completely different porosity, density, or strand thickness, which means the same products and techniques can produce very different results on each of them.
Instead of asking, “What routine works best?” it helps to ask, “What routine works best for my hair?” Once you understand how your curls respond to moisture, styling products, and different techniques, building a consistent routine becomes much easier.
The Science Behind Curly Hair Styling
Curly hair responds differently to styling because its shape changes as it dries. When your hair becomes wet, temporary hydrogen bonds inside the hair shaft loosen. As the hair dries, these bonds reform and help set the curl pattern. Styling techniques such as scrunching, finger coiling, and brush styling guide the curls into position before those bonds reset.
Styling products support this process by keeping curl groups together and adding hold while the hair dries. This is why applying products to soaking wet hair often creates better definition and longer-lasting results than styling hair that has already started to dry.
Prepare Your Hair Before Styling
Beautiful curls begin with proper preparation, and a few simple steps before styling can make a noticeable difference in curl definition and frizz control.
Step 1: Cleanse Your Hair
Healthy curls always start with a clean scalp. Use a gentle cleanser that removes dirt, oil, and product buildup without stripping away your hair’s natural moisture, and if your curls start feeling heavy or your styling products stop performing well, reach for a clarifying shampoo occasionally to clear that buildup.
Step 2: Condition and Detangle
Curly hair needs moisture before styling begins. Apply conditioner from the middle of your hair down to the ends, thenUse your fingers or a wide-tooth comb to gently remove tangles while your hair is still coated with conditioner. This reduces breakage and helps curls stay together as you move into styling.
Dermatologists recommend detangling textured hair while it is wet and coated with conditioner because it helps reduce breakage compared with brushing dry curls. Source: American Academy of Dermatology Association.
Step 3: Style on Soaking Wet Hair
One of the biggest mistakes people make is styling their hair after it has already started drying. Applying products to soaking wet hair helps lock in moisture, reduce frizz, form larger curl clumps, spread products evenly, and improve overall curl definition. If your hair starts to dry while you’re still styling, lightly spray it with water before adding more product.
Applying styling products to wet hair helps many people distribute products more evenly before the cuticle dries. While individual results vary, this approach is widely recommended by curly-hair professionals and educators because it can reduce curl clumping and frizz.
Keep Your Curls Hydrated Before Styling
Hydrated curls usually have better definition, smoother clumps, and less frizz, and these two techniques help your hair hold more moisture before styling products are even applied.
Squish to Condish
This technique is performed while your conditioner is still in your hair.
How to do it:
- Apply conditioner generously.
- Add a little water.
- Cup your curls from the ends.
- Scrunch upward toward your scalp.
- Repeat several times.
As you scrunch, your curls absorb more water and conditioner, which leaves them softer and better hydrated. This method works especially well for dry, damaged, or high-porosity curls.
Wet Plopping
Wet plopping gives your curls extra time to absorb moisture before styling continues.
How to do it:
- Finish conditioning or applying your leave-in conditioner.
- Cover your wet hair with a shower cap.
- Leave it covered for about 10 to 15 minutes.
- Remove the cap and continue styling as usual.
Many people notice softer curls and better product absorption after wet plopping.
Protein and Moisture Need to Stay Balanced
Moisture helps curls stay soft and flexible, while protein helps strengthen the hair shaft. Too much moisture may leave curls feeling limp, while too much protein can make them feel stiff. A balanced routine usually produces healthier, more defined curls.
Choose the Right Styling Products
Using more products doesn’t always give you better curls — instead, it helps to choose products based on what your hair actually needs.
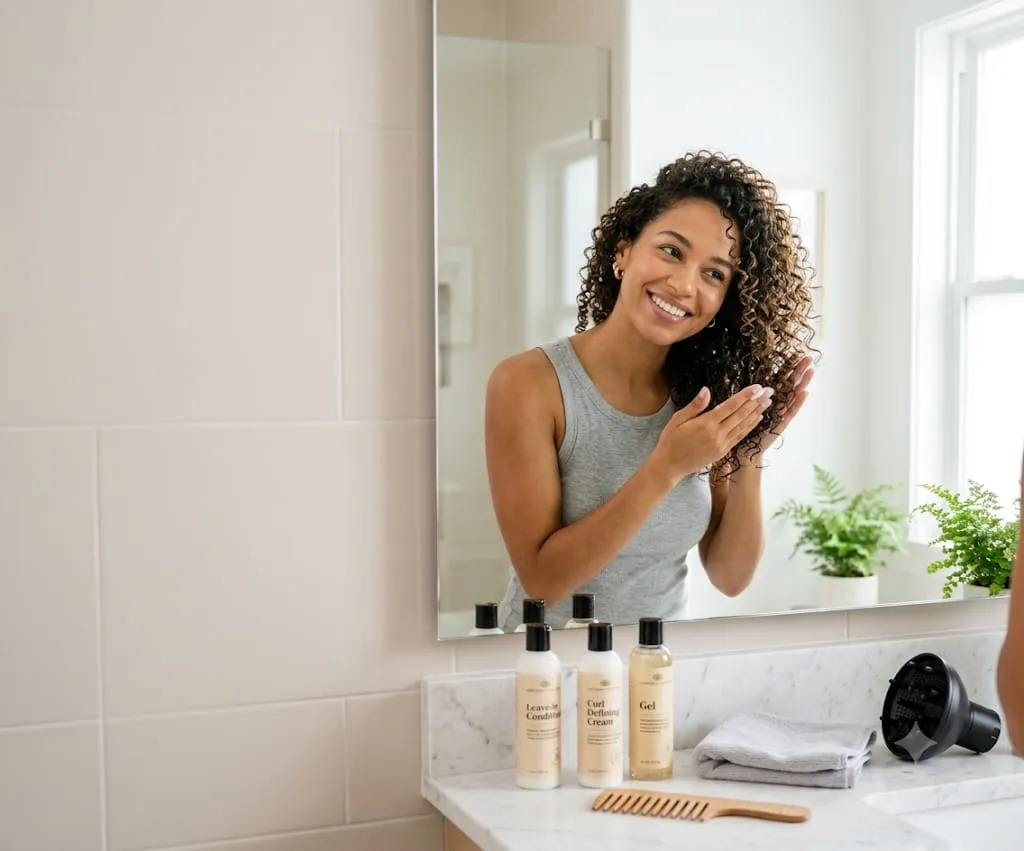
| Product | What It Does | Best For |
| Leave-in Conditioner | Adds moisture | Dry and damaged curls |
| Curl Cream | Hydrates and softens | Thick, curly, and coily hair |
| Mousse | Adds lightweight volume | Fine and wavy hair |
| Gel | Provides hold and definition | Most curl types |
| Hair Oil | Seals moisture after drying | Dry ends and reducing frizz |
Oils seal moisture rather than adding it and worth knowing before you buy, since castor oil and similar heavy oils are often marketed as moisturisers. Apply products from the lightest to the heaviest consistency, since this helps each product absorb properly without weighing your curls down.
Product choice depends on your hair rather than your curl pattern alone. Fine hair often performs better with lightweight products, while thicker or coarser curls may benefit from richer creams and stronger hold gels, so finding the right balance usually requires some experimentation.
Look at the Ingredients, Not Just the Product Name
Some styling products contain humectants, such as glycerin, which attract moisture from the surrounding air. Depending on the weather and your hair type, these ingredients may help improve hydration or increase frizz. Learning how your hair responds to different ingredients can help you choose products more confidently.
Do You Need Every Product?
Not necessarily. Many people achieve excellent results using only a leave-in conditioner and a gel, so it’s worth starting with a simple routine before adding extras like mousse or hair oil. Once you understand how your hair responds, you can build a more personalized routine from there.
What Order Should You Apply Curly Hair Products?
Applying products in the right order helps each one do its job properly. Lightweight products add moisture first, while heavier products lock everything in and provide hold — apply them out of order, and your curls may end up feeling greasy, heavy, or losing their shape more quickly.
| Step | Product | Why It Comes First |
| 1 | Leave-in Conditioner | Adds moisture and creates a smooth base. |
| 2 | Curl Cream | Defines curls while keeping them soft and hydrated. |
| 3 | Mousse (Optional) | Adds lightweight volume without weighing curls down. |
| 4 | Gel | Locks curl definition in place and creates long-lasting hold. |
| 5 | Hair Oil | Applied after hair is completely dry to soften the gel cast and reduce frizz. |
How to Choose the Right Styling Technique
Every styling method creates a different result, so instead of trying every technique on wash day, it’s more effective to choose one based on your main goal.
| If Your Goal Is… | Best Technique |
| Reduce frizz | Praying Hands |
| Create larger curl clumps | Brush Styling |
| Improve curl definition | Finger Coiling |
| Add volume | Scrunching + Diffusing |
| Increase moisture | Squish to Condish |
| Help products spread evenly | Raking |
| Make curls last longer | Smasters Technique |
| Cover thick hair evenly | Roping Method |
Quick Recommendation
Not sure where to start? Use this simple guide:
- New to curly hair styling? Start with the Praying Hands Method.
- Want better curl definition? Try Brush Styling.
- Need more volume? Combine Scrunching with Diffusing.
- Struggling with frizz? Style on soaking wet hair and finish with the Praying Hands Method.
Once you’re comfortable, experiment with other techniques to see what works best for your hair.
Styling Techniques That Help Define Curly Hair
There’s no single styling method that works for every curl type — some techniques create tighter curl clumps, while others add volume or reduce frizz. The best approach is to try different methods and see how your curls respond, and you may even find that combining two or three techniques in the same routine gives you the best results.
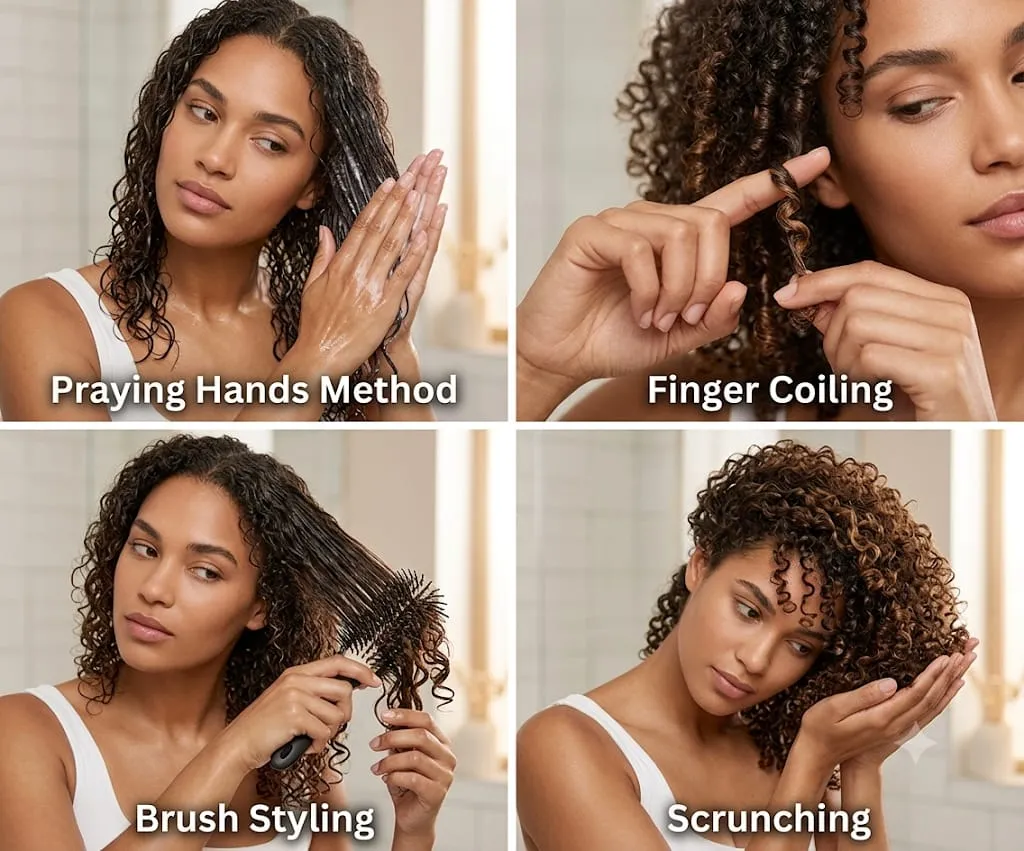
Praying Hands Method
Best for: Reducing frizz and evenly coating the hair with styling products.
The Praying Hands Method smooths products over the hair without breaking apart your natural curl clumps.
How to Do It:
- Apply a small amount of your styling product between your palms.
- Place a section of hair between both hands.
- Slide your hands from the roots to the ends.
- Repeat on each section.
- Finish by gently scrunching your curls.
Why It Works: This method smooths the hair cuticle while spreading products evenly, which helps reduce surface frizz and encourages larger curl clumps to form.
Raking Method
Best for: Even product distribution and separating curls.
The Raking Method uses your fingers like a comb to spread products through your hair.
How to Do It:
- Divide your hair into manageable sections.
- Rub your styling product between your palms.
- Use your fingers like a rake.
- Pull your fingers from the roots to the ends.
- Gently shake the section to allow curls to form naturally.
- Scrunch lightly if needed.
Why It Works: Raking helps products reach every strand instead of sitting only on the outside of the hair, and this technique also reduces product buildup in certain areas.
Finger Coiling
Best for: Defining curls that lose their shape.
If a few curls refuse to cooperate, finger coiling can reshape them without you having to style your entire head again.
How to Do It:
- Take a small curl section.
- Wrap it around your finger.
- Hold it for a few seconds.
- Release it gently.
- Continue wherever extra definition is needed.
Why It Works: Finger coiling trains individual curls to form a smoother spiral while reducing random frizz, and it also works well when refreshing second-day curls.
Brush Styling
Best for: Creating uniform curl clumps.
Brush styling uses a styling brush to guide individual strands into smoother curl clumps. Many people use a curl styling brush because it creates more consistent definition than styling with fingers alone.
How to Do It:
- Apply your styling products first.
- Work in small sections.
- Glide a styling brush from roots to ends.
- Twist the brush slightly as you reach the bottom.
- Allow the curl to spring back naturally.
- Scrunch gently afterward.
Why It Works: The brush aligns individual strands together, helping curls dry in larger, smoother clumps, and this method often creates shinier curls with less frizz.
Scrunching
Best for: Encouraging natural curl formation.
Scrunching is one of the easiest styling techniques, and it works well with almost every curl pattern.
How to Do It:
- Turn your head slightly forward.
- Cup the ends of your hair.
- Push them gently toward your scalp.
- Repeat around your head.
- Avoid squeezing too hard, as this can create frizz.
Why It Works: Scrunching encourages your natural curl pattern while helping products settle into each curl clump, which is why it’s often used after almost every other styling technique.
Bowl Method
Best for: Fine, wavy, or frizz-prone curls.
The Bowl Method helps distribute products evenly while adding extra moisture.
How to Do It:
- Apply your leave-in conditioner and styling products.
- Fill a bowl with warm water.
- Dip sections of your hair into the water.
- Scrunch after each dip.
- Repeat several times.
- Plop or dry your hair afterward.
Why It Works: The extra water helps products spread evenly while encouraging larger curl clumps, and many people with fine curls notice less frizz and fewer stringy pieces after using this method.
Smasters Technique
Best for: Long-lasting hold.
Instead of applying all your styling product at once, this method applies it in two stages.
How to Do It:
- Apply half of your gel or styler to soaking wet hair.
- Dry your hair until it is about halfway dry.
- Wet your hands lightly.
- Apply the remaining product.
- Finish drying completely.
Why It Works: Adding a second layer of product creates stronger hold without making curls stiff, and this method often helps curls last longer between wash days.
Smooch Method
Best for: Bigger curl clumps and reduced frizz.
This method combines smoothing and scrunching at the same time.
How to Do It:
- Smooth product onto one section.
- Immediately scrunch that same section.
- Continue around your entire head.
Why It Works: Smoothing controls surface frizz while scrunching encourages stronger curl formation, and many people notice fuller curl clumps after using this method.
Roping Method
Best for: Thick curls that need even product coverage.
The Roping Method gently squeezes products through each curl section.
How to Do It:
- Divide your hair into sections.
- Rub styling product between your palms.
- Wrap your hand around one section.
- Slide downward while gently squeezing.
- Finish by scrunching.
Why It Works: This technique coats every strand without pulling curls apart, and it also helps reduce dry spots where products are often missed.
Diffusing vs. Air Drying
Both drying methods have their advantages, so it’s worth choosing the one that fits your schedule and styling goals.
| Diffusing | Air Drying |
| Dries hair faster | Requires no heat |
| Adds volume | Less heat damage |
| Creates stronger definition | Softer finish |
| Helps curls last longer | Better for damaged hair |
| Great during cold weather | Best when you have extra time |
Use a diffuser attachment with low heat and low airflow whenever possible. Move the diffuser slowly around your head instead of holding it in one place to reduce frizz and heat damage.
Which Styling Technique Works Best?
| Goal | Best Technique |
| Reduce frizz | Praying Hands |
| Better product distribution | Raking |
| Stronger curl definition | Finger Coiling |
| Bigger curl clumps | Brush Styling |
| Extra hydration | Bowl Method |
| Longer-lasting curls | Smasters Technique |
| Maximum moisture | Squish to Condish |
| Thick hair coverage | Roping Method |
| Quick everyday styling | Scrunching |
Curly Hair Styling Routines for Different Goals
The best routine for you depends on how much time you have and the results you’re hoping for.
| Step | What to Do |
| 1 | Cleanse your hair |
| 2 | Apply conditioner and detangle |
| 3 | Apply leave-in conditioner |
| 4 | Apply curl cream (if needed) |
| 5 | Apply gel or mousse |
| 6 | Style using your preferred technique |
| 7 | Diffuse or air dry |
| 8 | Scrunch out the gel cast |
| 9 | Refresh curls over the next few days |
5-Minute Everyday Routine
Perfect when you’re in a hurry.
- Apply leave-in conditioner.
- Add a lightweight mousse.
- Scrunch gently.
- Air dry or diffuse for a few minutes.
This routine creates natural-looking curls with minimal effort.
Maximum Definition Routine
Choose this routine if you want well-defined curls that last for several days.
- Leave-in conditioner
- Curl cream
- Brush styling
- Medium or strong-hold gel
- Diffuse until dry
- Scrunch out the gel cast with a few drops of hair oil
Maximum Volume Routine
If your roots often look flat, this routine can help.
- Apply mousse to the roots.
- Scrunch upward.
- Diffuse with your head upside down.
- Gently lift the roots after your hair is completely dry.
Wash-and-Go Routine
This routine works well for people who prefer simple styling.
- Apply leave-in conditioner.
- Add gel using the Praying Hands Method.
- Scrunch your curls.
- Allow your hair to air dry naturally.
How to Style Different Curl Types
Every curl pattern has different needs, and choosing the right technique for your hair type can improve definition, reduce frizz, and make your style last longer.
Recommended routine:
- Apply a lightweight leave-in conditioner.
- Use mousse or a light-hold gel.
- Rake products through your hair.
- Scrunch upward to encourage wave formation.
- Diffuse on low heat for extra volume.
Best techniques:
- Raking
- Scrunching
- Brush Styling
- Bowl Method
How to Style Curly Hair (Type 3)
Curly hair needs the right balance of moisture and hold — too little moisture causes frizz, while too much product can weigh curls down.
Recommended routine:
- Apply leave-in conditioner.
- Follow with curl cream.
- Finish with a medium or strong-hold gel.
- Style in sections.
- Diffuse or air dry completely before touching your curls.
Best techniques:
- Praying Hands
- Finger Coiling
- Brush Styling
- Smooch Method
- Smasters Technique
How to Style Coily Hair (Type 4)
Coily hair is usually the driest curl type, so it benefits from rich moisturizing products and styling methods that help reduce shrinkage.
Recommended routine:
- Apply a rich leave-in conditioner.
- Follow with curl cream.
- Seal moisture with a styling gel.
- Finish with a lightweight oil after your hair is dry.
Best techniques:
- Finger Coiling
- Roping Method
- Twist-Outs
- Braid-Outs
- Shingling
Working in small sections helps every coil receive enough moisture and product.
Styling Curly Hair in Different Weather Conditions
The weather can change how your curls behave, and small adjustments to your routine can help your style last longer no matter the season.
Humid Weather
Humidity often causes frizz because curly hair absorbs moisture from the air. To reduce frizz, choose a stronger hold gel, avoid touching your curls while they dry, and finish with a lightweight hair oil once your hair is dry.
Dry Weather
Dry air pulls moisture out of your curls. To keep your hair hydrated, use a richer leave-in conditioner, add a curl cream before your gel, and deep condition your hair regularly.
Winter
Cold weather and indoor heating can leave curls feeling dry. Protect your hair by reducing heat styling, using moisturizing products, and wearing satin-lined hats whenever possible.
Summer
Heat, sweat, and UV exposure can dry out curly hair during the warmer months. Rinse your hair after swimming, use lightweight styling products, and protect your curls from excessive sun exposure with a hat when spending long periods outdoors.
Common Styling Mistakes to Avoid
Even the best products can’t fix a routine filled with common mistakes, and avoiding these habits can make a noticeable difference in your results.
Applying Products to Dry Hair
Curly hair absorbs styling products better when it’s soaking wet, so if your hair begins drying while you’re styling, spray it lightly with water before continuing.
Using Too Much Product
Adding more product doesn’t always improve curl definition — instead, apply small amounts and build gradually if you need more hold or moisture.
Touching Your Hair While It Dries
Many people accidentally create frizz by constantly touching their curls, so after styling, let your hair dry completely before fluffing or separating curl clumps.
Skipping Conditioner
Conditioner provides the moisture curly hair needs before styling, and without enough moisture, curls often become rough, dry, and difficult to define.
Brushing Dry Curly Hair
Brushing dry curls usually separates curl clumps and creates unnecessary frizz, so it’s best to always detangle curly hair while it’s wet and coated with conditioner.
Ignoring Product Buildup
Styling products slowly build up on the hair over time, and clarifying your hair occasionally helps styling products work more effectively again.
Curly Hair Troubleshooting Guide
Even with a good routine, curly hair can sometimes behave differently than expected. Here are some common problems and simple ways to fix them.
Why Are My Curls Flat?
Flat curls usually happen when products are too heavy or the roots dry without enough lift.
Try this:
- Diffuse upside down.
- Use less curl cream.
- Add mousse at the roots.
Why Are My Curls Stringy?
Stringy curls often mean your hair needs more water during styling, or that the products weren’t distributed evenly.
Try this:
- Style on soaking wet hair.
- Use the Bowl Method.
- Brush style to create larger curl clumps.
Why Does My Hair Feel Crunchy?
A crunchy texture usually means your gel has created a cast, and this is completely normal. Once your hair is completely dry, gently scrunch your curls with clean hands or a few drops of lightweight oil to soften the cast while keeping the definition intact.
This firm layer is known as a gel cast. Once your hair is completely dry, gently scrunching the cast with clean hands or a few drops of lightweight oil softens the hair while keeping the curl definition. Many curly-haired people call this step Scrunch Out the Crunch (SOTC).
Why Don’t My Curls Last?
If your curls lose their shape quickly, try using a stronger hold gel, applying products evenly in sections, and avoiding touching your hair while it dries.
Why Are My Roots Flat?
Flat roots often happen when hair dries too close to the scalp. Try diffusing upside down or gently lifting the roots with diffuser airflow while drying.
Expert Tips
- Change only one part of your routine at a time.
- Test a new technique for at least three wash days before deciding whether it works.
- Start with less product—you can always add more if needed.
- Avoid touching your curls while they dry.
- Consistency usually produces better results than constantly changing products.
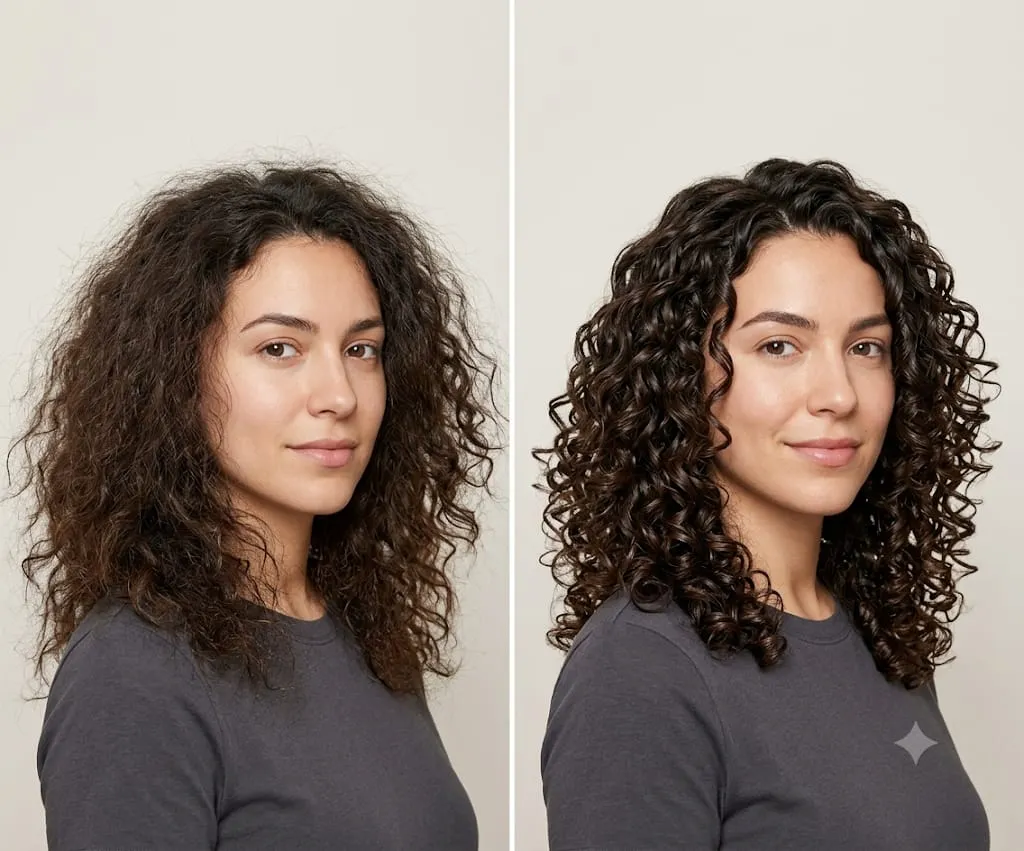
How to Make Your Curls Last Longer
Good styling doesn’t end on wash day — a few simple habits can help your curls stay defined for several days afterward.
Sleep on a Silk or Satin Pillowcase
Cotton absorbs moisture and creates friction, while silk and satin allow curls to glide smoothly, which helps reduce frizz and breakage overnight.
Protect Your Hair Overnight
Many people use a loose “pineapple” hairstyle before bed. Simply gather your curls loosely on top of your head using a soft scrunchie to help protect curl definition while you sleep.
Refresh Your Curls Between Wash Days
You don’t always need to wash your hair to revive your curls. Instead, lightly mist your hair with water, Apply a small amount of leave-in conditioner or a curl refresh spray, then gently scrunch your curls to bring back definition. A quick refresh often restores bounce in just a few minutes.
Refresh Routine by Day
You don’t need a full wash every time your curls lose definition.
- Day 2: Lightly mist your hair with water and scrunch your curls.
- Day 3: Add a small amount of leave-in conditioner or curl refresher spray before scrunching.
- Day 4: Finger coil any curls that have lost their shape and smooth frizzy sections with a little gel.
- Day 5: If your curls feel heavy from product buildup, it may be time for your next wash day.
Avoid Heavy Product Buildup
Applying new styling products every day without washing can make curls feel sticky and limp, so it’s best to use only small amounts during refresh days.
Healthy Curl Habits
- Clarify regularly.
- Deep condition weekly.
- Trim split ends.
Beginner Curly Hair Styling Checklist
Before finishing your styling routine, check these simple steps.
- ✔ Hair is soaking wet before applying products.
- ✔ Conditioner has been rinsed or partially left in, depending on your routine.
- ✔ Products are applied in the correct order.
- ✔ Hair is styled in sections.
- ✔ Curls are scrunched gently.
- ✔ Hair is left untouched while drying.
- ✔ Gel cast is softened only after hair is fully dry.
If you can check every box, you’re giving your curls the best chance to stay defined and healthy.
How Often Should You Style Curly Hair?
There’s no single schedule that works for everyone — your routine depends on your curl type, lifestyle, and the products you use. As a general guide:
| Routine | Recommended Frequency |
| Wash and style | Every 3–7 days |
| Refresh curls | Daily or as needed |
| Deep condition | Once a week |
| Clarify to remove buildup | Every 3–6 weeks, or sooner if you use heavy styling products frequently |
| Protein treatment | Only when your hair shows signs of needing extra strength, following the product instructions |
Pay attention to how your hair feels, and if it becomes dry, heavy, or difficult to style, adjust your routine instead of sticking to a fixed schedule.
Key Takeaways
- Apply styling products to soaking wet hair.
- Choose products based on your hair’s needs, not just your curl type.
- Use styling techniques that match your goal, whether it’s volume, definition, or frizz control.
- Let your curls dry completely before touching them.
- Build a routine around your own hair instead of copying someone else’s.
Frequently Asked Questions
Is air drying better than diffusing?
Both methods work well. Air drying reduces heat exposure, while diffusing speeds up drying and usually creates more volume.
Can I use mousse and gel together?
Most people style their curls after every wash day and refresh them as needed until the next wash.
Can I combine different styling techniques?
Yes. Many people combine methods such as Praying Hands with Scrunching, or Raking with Finger Coiling, to achieve better results.
Which styling technique reduces frizz the most?
The Praying Hands Method, combined with styling on soaking wet hair and allowing curls to dry without touching them, often provides the smoothest finish.
Curl Styling Cheat Sheet
| If You Want… | Do This |
| More definition | Brush Style + Gel |
| Less frizz | Praying Hands + Style on soaking wet hair |
| More volume | Scrunch + Diffuse upside down |
| More moisture | Squish to Condish + Leave-in Conditioner |
| Longer-lasting curls | Smasters Technique + Strong Hold Gel |
| Quick routine | Leave-in + Gel + Scrunch |
Final Thoughts
Learning how to style curly hair is rarely about finding one “perfect” technique. In reality, healthy, defined curls come from understanding your own hair and making small, consistent improvements over time.
One pattern becomes clear when you compare expert recommendations, dermatology guidance, and the routines shared by experienced curly-haired communities: the people who achieve the most consistent results usually keep their routine simple. Instead of constantly buying new products, they focus on understanding how their hair responds to moisture, product amounts, styling techniques, and drying methods.
If there’s one piece of advice worth remembering, it’s this: don’t judge your routine after a single wash day. Give each technique several attempts before deciding whether it works for your hair. Change only one variable at a time—such as your styling method, product amount, or drying technique—so you can clearly see what improves your results.
Every head of curly hair is different, and that’s exactly why there isn’t a one-size-fits-all routine. Treat this guide as a starting point, experiment patiently, and build a routine based on what your own curls tell you—not just what works for someone else. Over time, that personalized approach is far more likely to give you healthier, more defined, and longer-lasting curls.